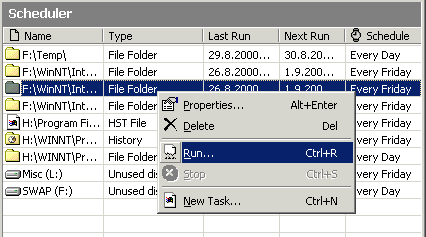
The Scheduler window consists of a list very similar to the one in On-Demand view containing the scheduled tasks. In the next section you will learn how to schedule tasks and add them to the list.

The list has five columns showing you the name, type, last run time, next run time and schedule associated with the data on a row.
| The name column shows you the name and full path of a file or folder scheduled to be erased or the letter of the drive whose unused disk space is to be erased.
|
| The type column shows the name of the type associated with a file extension, or the type of data to be erased.
|
| The last run column shows you the time when the task was last completed.
|
| The next run column shows you when the task is scheduled to run next.
|
| The schedule column shows you whether the task is scheduled to be run daily or weekly (and what day of the week).
|
You can refresh the list contents by selecting the Refresh command from the Edit menu or by pressing F5.
The pop-up menu shown above can be opened by right-clicking (or clicking with the secondary mouse button) the list. It contains some of the most used commands that are briefly discussed below.
| The Properties menu item
|
|
|
| (keyboard shortcut Alt+Enter) opens the task property window allowing you to edit the selected task.
|
| The Delete menu item
|
|
|
| (keyboard shortcut Del) removes the selected task from the list.
|
| The Run menu item
|
|
|
| (keyboard shortcut Ctrl+R) starts processing the selected task (without confirmation).
|
| The Run All menu item
|
|
|
| (keyboard shortcut Ctrl+Alt+R) starts processing all items on the list. This is again done without asking for your confirmation; use this action with caution!
|
| The Stop menu item
|
|
|
| (keyboard shortcut Ctrl+S) stops processing the selected task or if the task is queued, removes it from the queue.
|
| The New Task menu item (keyboard shortcut Ctrl+N) opens the task property window allowing you to enter a new task to the list.
|
You can get a detailed description of the menu items on the Menu Reference section or by using the context-sensitive help; click the help button on the toolbar and select the menu item whose help section you wish to open.
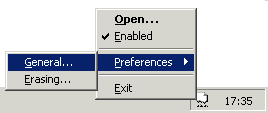
From the Scheduler page of the General Preferences window you can change several settings for the Scheduler. As default the Scheduler is set to run at Windows startup and the next time you start Windows, you will indeed notice a new icon on the taskbar tray area.

You can open the main window by double-clicking the icon or open a pop-up menu by right clicking it.
The menu contains items allowing you to open the main window, change the Scheduler state, edit preferences and quit the application.
If you deselect the "Enabled" option on the tray menu, it will set the Scheduler to a disabled state meaning that it ignores all scheduled tasks until you enable it again. This is useful if you are working on something and do not want erasing to slow down the system during that time.
The tray icon will change to signal when the Scheduler is disabled and also when it is running one or more tasks. The icon tool tip will tell you when the next task is scheduled to run.
[